No Cape, No Starworld - Learning the basics and more - by Schwartz RTA
Contents
- 1 Introduction
- 2 Route
- 3 Holding your controller
- 4 Individual World Analysis
Introduction
No Cape, No Starworld is the "No Cape" counterpart of No Starworld. The spirit of the category is really simple : we need to beat bowser without using cape and without going through Starworld.
You can find the category page here.
Here are the official rules of the category :
- Time begins the frame Mario appears in the opening cutscene.
- This is 2.2 seconds after selecting 1 player game.
- Time ends on the frame that Peach appears outside of Bowser's Clown Car.
- No Starworld
- No Arbitrary Code Execution
- No Cape
- No Orb/Cloud
- Penalties: If a cape is obtained, die as soon as possible without utilizing it.
For more info on the major glitches that are banned in this category, see : Orb ; Cloud and Unintended Sprite Spawning.
The main reason for banning those glitches is arbitrary. Runners consider that the run is more interesting that way. Allowing the Orb glitch leads to a lot of backtracking and a lot of lame ways to kill a run (the game can crash for example).
The penalty rule is more of a race rule but it also helps that the run can be finished even if the player grabs a cape. It's actually pretty rare. The biggest threats are the roulette blocks.
To end this part, the no ACE rule is pretty common is main categories that are not credit warp. Here's a link just in case you're curious about it : ACE
This tutorial is gonna be oriented for beginners but also will give several clues on how to improve and go toward the famous sub 35 run.
Route
This category has one main route. You can find it on this page here.
Technically, nothing prevents you from doing extra levels as long as you don't enter Starworld. Realistically, players have no interest in taking another route since all other options are extremely slow and not necessarily easier.
|
Video: NCNSW - Beginner - Introduction Source: Schwartz_RTA |
Holding your controller
This tutorial is oriented for beginners, so we have to talk about how to hold your controller in Super Mario World.
Super Mario World is a game where we're almost gonna use all buttons. All directions on the dpad, L/R triggers, Select, Start (if you mess it up), Y, X, B, A.
- The dpad is use for moving mario, throwing items or swimming with precision.
- L/R triggers are used for screen scrolls during levels which is very useful is some scenarios. Note : You need to release all other buttons to get the scroll to work !
- Y,X are used for running, holding/throwing an item or even shooting fireballs. Both buttons do the same thing. But having both buttons is actually very important as we'll see later.
- B is for normal jumps.
- A is for spin jumps.
- Select can be used to drop a powerup from your itembox.
- Start pauses the game. If mario cleared any exit in a level and press Start to pause the game and then Select : you will go back to the overworld. It's useful to know that in case you want to gather more resources from a level you already cleared in order to gain an advantage in a later level.
Why is it important to talk about this trivial matter ? It's because it's not trivial at all. As we can see, the player have a lot of buttons to worry about and the layout of the SNES controller is not really helping when you have to press Y and X for a strat for example or quickly switch between normal jumps (B) and spin jumps (A).
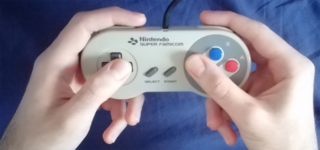
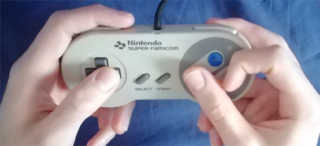
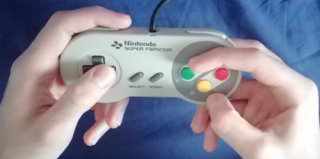
In order to deal with that many inputs, you need to be able to hold your controller properly. There are many ways to hold your controller but we'll look at the 2 main ways to do it. Those ways are not exclusive. Being able to switch at will between those grips is part the weaponry of an experienced player.
Standard Grip
Standard Grip consist in having your right thumb pressing resting on Y/B or X/A and that's all.
When it comes to pure platforming, this grip can be quite tricky to use. If you need to quickly switch between jumps without releasing run buttons, you will need roll your thumb from Y/B to X/A without releasing either Y or X. If this is impossible, you can also reach the A button with your index finger performing a quick A Claw.
However, this grip shines when the player needs to manipulate items. Releasing the Y or X buttons in order to throw/drop an item is easily done with precision by jump lifting your thumb from the button. This can easily be done without releasing jump too.
Claw Grip
Claw Grip (or here, X-Claw Grip) consist in putting the side of your right index finger on the X button. This allows you to freely press Y,B or A with your thumb while having the run button (X here) pressed constantly.
This grip is, in my opinion, the easiest way to perform any platforming action as long as they don't require any item manipulation (throwing/dropping items). You can easily switch jumps without being worried about releasing run buttons.
It is possible, but quite tricky, to perform item tricks while in claw grip. This is not really what is recommended by this tutorial. If item tricks are needed and the player is in claw, the player can switch back to standard grip by pressing Y without releasing X then release the claw. This leads to the player not throwing any items on accident (if he's holding one) while being able to go for the more comfortable standard grip for item manipulations.
Individual World Analysis
In this section, we're going to analyze every part of the run.
World 1 : Cutscene Land
|
Video: NCNSW - Beginner - W1 Source: Schwartz_RTA |
Castle 1
I spoke about this at the end of the video but forgot while doing room 1 of Castle 1 : Claw Grip is highly recommended for room 1 of Castle 1 because of how the fences works. You cannot press A to jump out of fences and if you are in Standard Grip (holding X/A most likely here), you will end up punching the fence while changing to Y/B. For other levels in this world, any grip can be used with the same efficiency.
World 2 : Reset Land
|
Video: NCNSW - Beginner - W2 part 1 Source: Schwartz_RTA |
|
Video: NCNSW - Beginner - W2 part 2 Source: Schwartz_RTA |
World 3 : Bad Buibui Fireball Land
|
Video: NCNSW - Beginner - W3 Source: Schwartz_RTA |
World 4 : Boring Land
|
Video: NCNSW - Beginner - W4 Source: Schwartz_RTA |
World 5 : Forest of RNG
|
Video: NCNSW - Beginner - W5 Source: Schwartz_RTA |
Forest of Illusion 2
You can find the yoshi clip flow chart here. On the same page, you'll find the visual cue that is used for the clip.
Castle 5
How to deal with the platforms at the end of the level is explained in the video. But I'll put it here in writing.
Platform 1 is here => Run on platform 1 => Platform 2 is here => Jump on platform 2 => Jump to the end.
Platform 1 is here => Run on platform 1 => Platform 2 is not here => Full jump on platform 3 => Jump to the end.
Platform 1 is not here => Jump on platform 2 => Jump to the end.
World 6 : Choke-o-late Island
|
Video: NCNSW - Beginner - W6 Source: Schwartz_RTA |
Chocolate Secret
If you want to go for the p-speed ending in room 3. Assuming that you are on the flat sandbar just before the 2 slopes and you jump on the first slope, here are the 3 scenarios :
- You keep p-speed and get a jump off the slope. The full jump will help you reach the pipe area.
- You lose p-speed and you don't get a jump off the slope. If you hold B during that time, it's very unlikely for you to die. You will most likely just run off the first slope into the second one. In that case, you jump off it to reach the pipe area.
- You lose p-speed and you get a jump off the slope. Pay attention to the screen scroll. If you screen scroll fast, it means you kept p-speed. If the screen goes slower, then you lost it. In that case, you need to turnback as soon as possible and fall back on the last slope. Then jump off it to reach the pipe area. Be careful, doing a full jump off the first slope when you lost p-speed result in a death !
World 7 : Valley of Sandbar
|
Video: NCNSW - Beginner - W7 Source: Schwartz_RTA |
Valley of Bowser 2
If you want more info on sandbar clip (it is not covered by this tutorial), look here or here.
Back Door
|
Video: NCNSW - Beginner - Bowser Source: Schwartz_RTA |


