せんべいやま コース1
| せんべいやま コース1 | ||||||||||||||

| ||||||||||||||
| ← チーズブリッジ コース1 ~ ソーダのみずうみ → | ||||||||||||||
| Powerups | ||||||||||||||
| Lunar Dragon | ||||||||||||||
| Goal Times | ||||||||||||||
| ||||||||||||||
Contents
96 Exit
Normal Flight
|
Video: Cookie Mountain - Cape Source: Sten |
Boss Kill
See the Boss Kill page for more general information about Boss Kills.
|
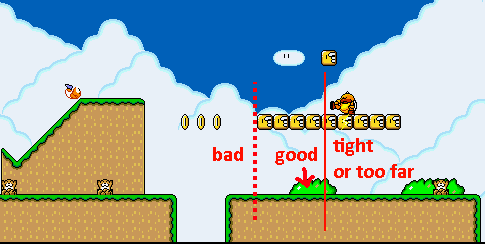
👀 Visual Cue: |
Slow Setup
This setup loses about a second and a half, but it allows for pressing select while holding right with the left hand, rather than pressing select with something else while moving left. The positioning for the eat cancel is arguably easier.
|
Video: Cookie Mountain - Cape, Yoshi (Boss Kill, Easier) Source: SilverStar6609 |
Fast Setup
|
Video: Cookie Mountain - Cape, Yoshi (Boss Kill, Safe Shell Throw) Source: Sten |
Fast Shell Throw
The shell throw in this setup can be affected by Mario's speed, and is less reliable
|
Video: Cookie Mountain - Cape, Yoshi (Boss Kill, Fast Shell Throw) Source: Sten |
Fastest Setup
The positioning is the most difficult part of this setup. Mario must get knocked off of yoshi by the left koopa, which is more difficult, as it is moving left. Mario must also very quickly land on the koopa after the eat cancel happens; landing on it too late will cause a normal stunned koopa to spawn instead of a glitched stunned koopa. Lastly, the stun timer from the glitched koopa must reach 0; if Mario fireballs the glitched koopa into a coin before the stun timer reaches 0, the boss will not spawn.
One tip for getting the eat cancel is to get yoshi's tongue to "wrap around" the shell and the koopa. The closer together you make the inputs for the flower drop and the jump to get on yoshi (ie spawning the koopas), the greater this effect gets.
For 96 exit, the cape doesn't need to be dropped, but for all castles, dropping the cape as soon as the fire flower is grabbed is best. Sometimes the cape can end up too far left, in this case, either jump left with yoshi quickly after killing the boss, or wait a half second doing the kill and then tongue left after landing on yoshi. One other backup, in case Mario misses landing on the koopa, is to go to the corner the red shell originally spawned in, and do the old scrolless setup.
|
Video: Cookie Mountain - Cape, Yoshi (Boss Kill, Fastest) Source: SilverStar6609 |
All Castles
The Boss Kill strats from 96 exit also work for All Castles, only it is important to switch back to cape after killing the boss.
Normal Flight
|
Video: Cookie Mountain - Cape, Yoshi (Normal Flight) Source: GreenDeathFlavor |
Yoshi Flight
Dismount yoshi against the block to enter a glitched state where mario is in normal flight on yoshi. Sticking out yoshi's tongue causes him to not turn around when tapping left.
|
Video: Cookie Mountain - Cape, Yoshi (Yoshi Flight) Source: Sten |
Flower Grab
If entering the stage without a Fire Flower in the item box, it is possible to grab one here to save time killing Ludwig.
|
Video: Cookie Mountain - Cape, Yoshi, Get Fire Source: Lui |
All Castles, No Cape
No Boss Kill
|
Video: Cookie Mountain - All Castles No Cape, Yoshi, Get Fire Source: Fitz1889 |
Boss Kill
|
Video: Cookie Mountain - No Cape, Yoshi (CMBK) Source: Schwartz_RTA |
95 Exit, No Cape
Skipping Fire
|
Video: Cookie Mountain - No Cape, Blue Yoshi (Special Beaten) Source: Sten |
Grabbing Fire
|
Video: Cookie Mountain - No Cape, Blue Yoshi, Special World ON Source: Schwartz_RTA |
Boss Kill
If you manage to reach Cookie Mountain with two flowers, you can perform CMBK as shown in the All Castle, No Cape section.
Lunar Dragon
|
Video: Cookie Mountain - Lunar Dragon Source: Umari0 |
Small Only
The shell can be bounced off the pipe as an alternative to the shell jump.
|
Video: Cookie Mountain - Small Only Source: rezephos |
